GraphQL API#
Running GraphQL queries#
Direct API interactions in Lagoon are done via GraphQL.
In order to authenticate with the API, we need a JWT (JSON Web Token) that allows us to use the GraphQL API as admin. To generate this token, open the terminal of the storage-calculator pod via your Kubernetes UI, or via kubectl and run the following command:
This will return a long string which is the JWT token. Make a note of this, as we will need it to send queries.
We also need the URL of the API endpoint, which can be found under "Ingresses" in your Kubernetes UI or via kubectl on the command line. Make a note of this endpoint URL, which we will also need.
To compose and send GraphQL queries, we recommend GraphiQL.app, a desktop GraphQL client with features such as autocomplete. To continue with the next steps, install and start the app.
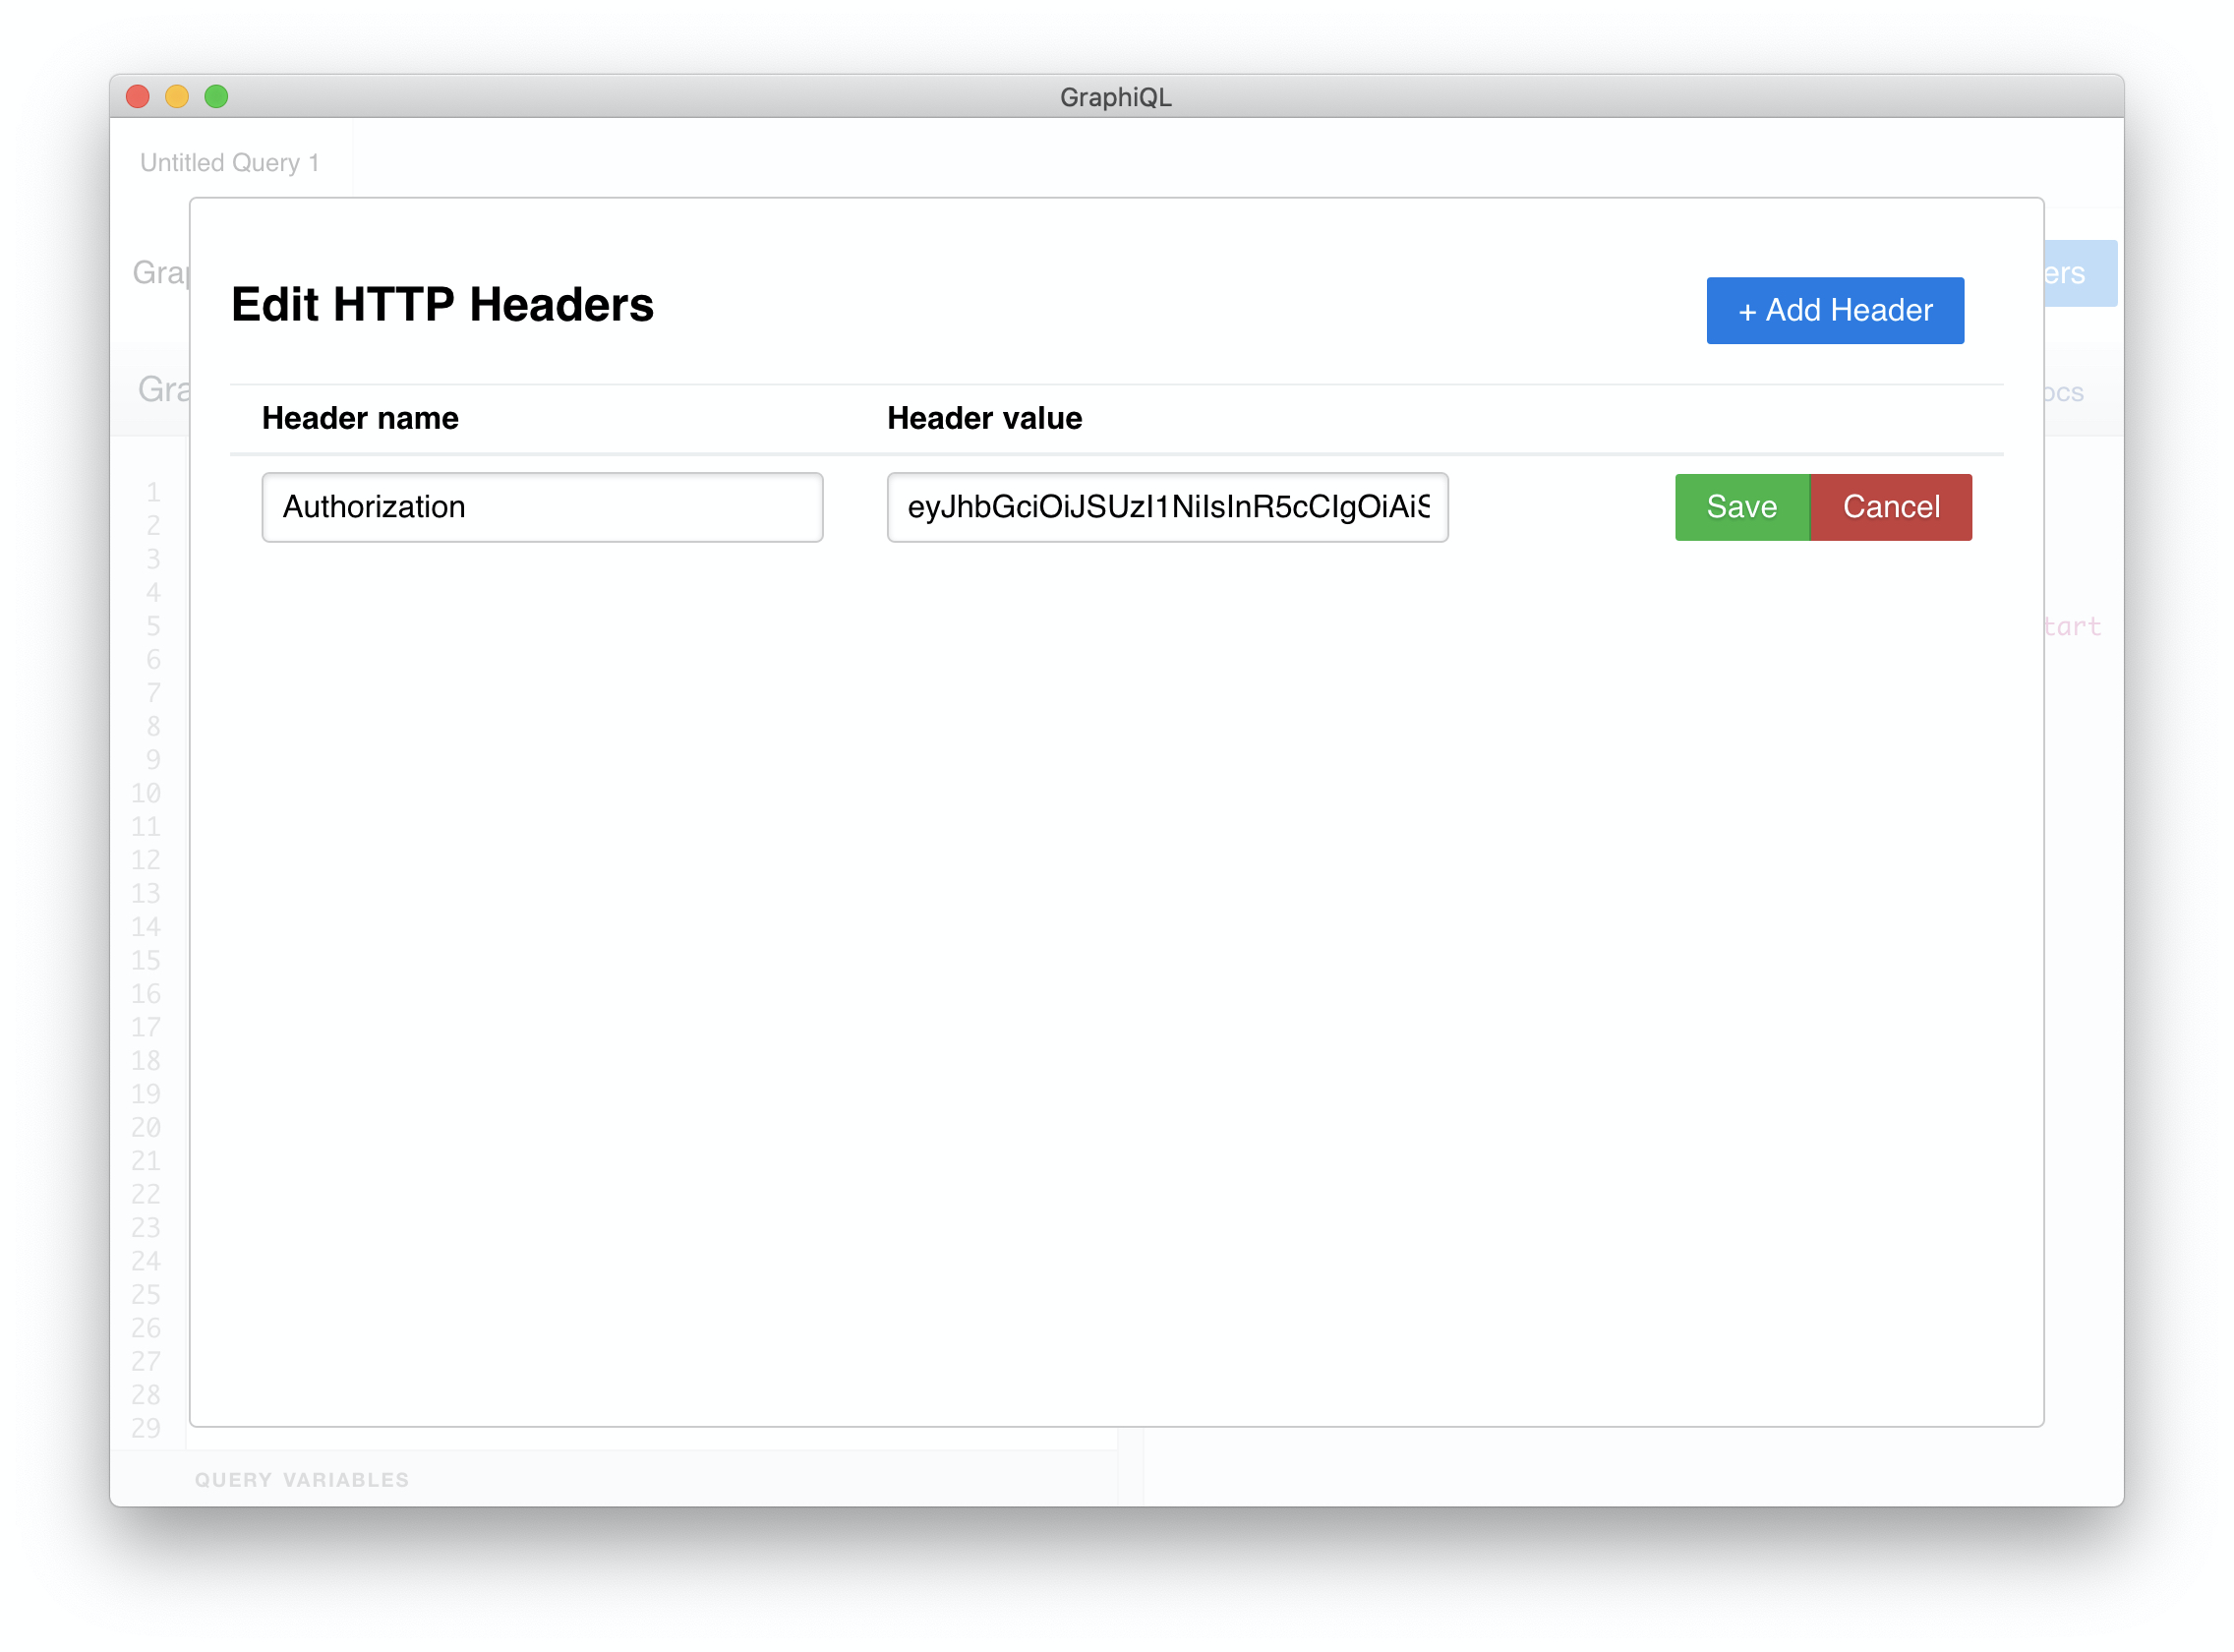
Under "GraphQL Endpoint", enter the API endpoint URL with /graphql on the end. Then click on "Edit HTTP Headers" and add a new header:
- "Header name":
Authorization - "Header value":
Bearer [JWT token](make sure that the JWT token has no spaces, as this would not work)
Press ESC to close the HTTP header overlay and now we are ready to send the first GraphQL request!
Enter this in the left panel
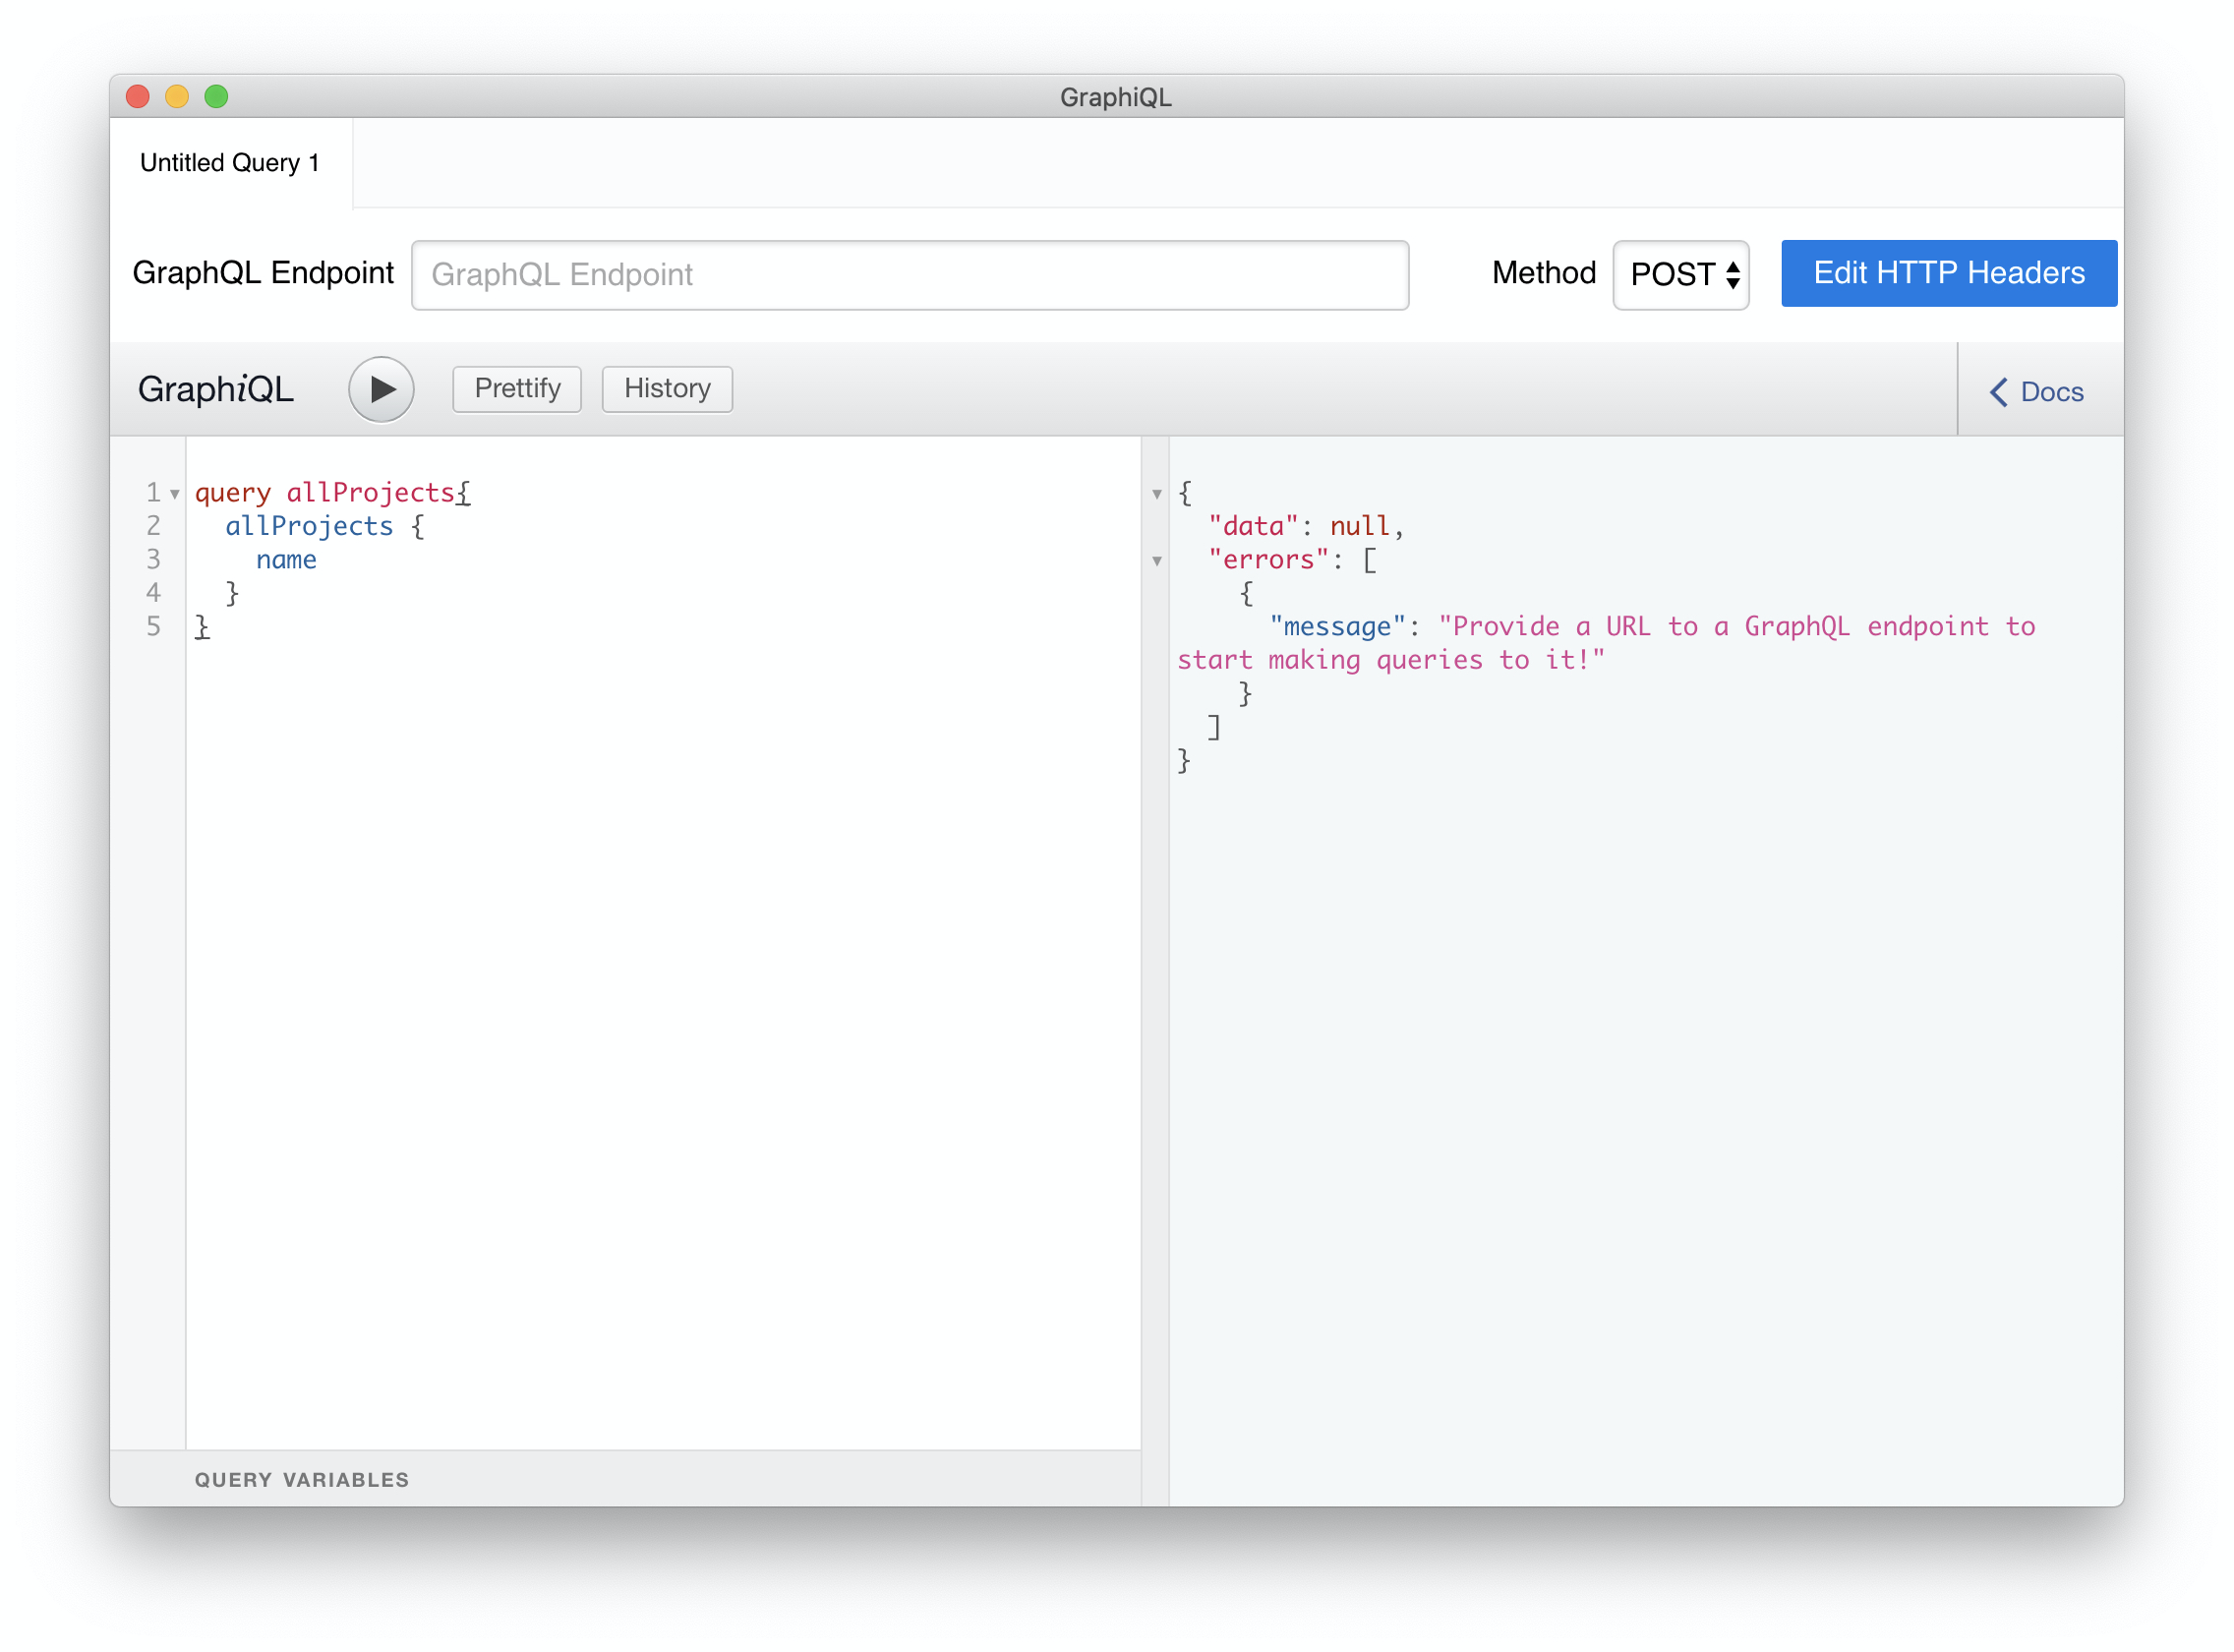
And press the ▶️ button (or press CTRL+ENTER).
If all went well, your first GraphQL response should appear shortly afterwards in the right pane.
Creating the first project#
Let's create the first project for Lagoon to deploy! For this we'll use the queries from the GraphQL query template in create-project.gql.
For each of the queries (the blocks starting with mutation {), fill in all of the empty fields marked by TODO comments and run the queries in GraphiQL.app. This will create one of each of the following two objects:
kubernetes: The Kubernetes (or Openshift) cluster to which Lagoon should deploy. Lagoon is not only capable of deploying to its own Kubernetes cluster, but also to any Kubernetes cluster anywhere in the world.project: The Lagoon project to be deployed, which is a Git repository with a.lagoon.ymlconfiguration file committed in the root.
Allowing access to the project#
In Lagoon, each developer authenticates via their SSH key(s). This determines their access to:
- The Lagoon API, where they can see and edit projects they have access to.
- Remote shell access to containers that are running in projects they have access to.
- The Lagoon logging system, where a developer can find request logs, container logs, Lagoon logs and more.
To allow access to the project, we first need to add a new group to the API:
mutation {
  addGroup (
    input: {
      # TODO: Enter the name for your new group.
      name: ""
    }
  )     {
    id
    name
  }
}
Then we need to add a new user to the API:
mutation {
  addUser(
    input: {
      email: "michael.schmid@example.com"
      firstName: "Michael"
      lastName: "Schmid"
      comment: "CTO"
    }
  ) {
    # TODO: Make a note of the user ID that is returned.
    id
  }
}
Then we can add an SSH public key for the user to the API:
mutation {
  addSshKey(
    input: {
      # TODO: Fill in the name field.
      # This is a non-unique identifier for the SSH key.
      name: ""
      # TODO: Fill in the keyValue field.
      # This is the actual SSH public key (without the type at the beginning and without the comment at the end, ex. `AAAAB3NzaC1yc2EAAAADAQ...3QjzIOtdQERGZuMsi0p`).
      keyValue: ""
      # TODO: Fill in the keyType field.
      # Valid values are either SSH_RSA, SSH_ED25519, ECDSA_SHA2_NISTP256/384/521
      keyType: SSH_RSA
      user: {
        # TODO: Fill in the userId field.
        # This is the user ID that we noted from the addUser query.
        id:"0",
        email:"michael.schmid@example.com"
      }
    }
  ) {
    id
  }
}
After we add the key, we need to add the user to a group:
mutation {
  addUserToGroup (
    input: {
      user: {
        #TODO: Enter the email address of the user.
        email: ""
      }
      group: {
        #TODO: Enter the name of the group you want to add the user to.
        name: ""
      }
      #TODO: Enter the role of the user.
      role: OWNER

    }
  ) {
    id
    name
  }
}
After running one or more of these kinds of queries, the user will be granted access to create tokens via SSH, access containers and more.
Adding notifications to the project#
If you want to know what is going on during a deployment, we suggest configuring notifications for your project, which provide:
- Push notifications
- Build start information
- Build success or failure messages
- And many more!
As notifications can be quite different in terms of the information they need, each notification type has its own mutation.
As with users, we first add the notification:
mutation {
  addNotificationSlack(
    input: {
      # TODO: Fill in the name field.
      # This is your own identifier for the notification.
      name: ""
      # TODO: Fill in the channel field.
      # This is the channel for the message to be sent to.
      channel: ""
      # TODO: Fill in the webhook field.
      # This is the URL of the webhook where messages should be sent, this is usually provided by the chat system to you.
      webhook: ""
    }
  ) {
    id
  }
}
After the notification is created, we can now assign it to our project:
mutation {
  addNotificationToProject(
    input: {
      notificationType: SLACK
      # TODO: Fill in the project field.
      # This is the project name.
      project: ""
      # TODO: Fill in the notification field.
      # This is the notification name.
      notificationName: ""
      # TODO: OPTIONAL
      # The kind notification class you're interested in defaults to DEPLOYMENT
      contentType: DEPLOYMENT/PROBLEM
      # TODO: OPTIONAL
      # Related to contentType PROBLEM, we can set the threshold for the kinds of problems
      # we'd like to be notified about
      notificationSeverityThreshold "NONE/UNKNOWN/NEGLIGIBLE/LOW/MEDIUM/HIGH/CRITICAL
    }
  ) {
    id
  }
}
Now for every deployment you will receive messages in your defined channel.
Example GraphQL queries#
Adding a new Kubernetes target#
Note
In Lagoon, both addKubernetes and addOpenshift can be used for both Kubernetes and OpenShift targets - either will work interchangeably.
The cluster to which Lagoon should deploy.
mutation {
  addKubernetes(
    input: {
      # TODO: Fill in the name field.
      # This is the unique identifier of the cluster.
      name: ""
      # TODO: Fill in consoleUrl field.
      # This is the URL of the Kubernetes cluster
      consoleUrl: ""
      # TODO: Fill in the token field.
      # This is the token of the `lagoon` service account created in this cluster (this is the same token that we also used during installation of Lagoon).
      token: ""
    }
  ) {
    name
    id
  }
}
Adding a group to a project#
This query will add a group to a project. Users of that group will be able to access the project. They will be able to make changes, based on their role in that group.
mutation {
  addGroupsToProject (
    input: {
      project: {
        #TODO: Enter the name of the project.
        name: ""
      }
      groups: {
        #TODO: Enter the name of the group that will be added to the project.
        name: ""
      }
    }
  ) {
    id
  }
}
Adding a new project#
This query adds a new Lagoon project to be deployed, which is a Git repository with a .lagoon.yml configuration file committed in the root.
If you omit the privateKey field, a new SSH key for the project will be generated automatically.
If you would like to reuse a key from another project. you will need to supply the key in the addProject mutation.
mutation {
  addProject(
    input: {
      # TODO: Fill in the name field.
      # This is the project name.
      name: ""
      # TODO: Fill in the private key field (replace newlines with '\n').
      # This is the private key for a project, which is used to access the Git code.
      privateKey: ""
      # TODO: Fill in the Kubernetes field.
      # This is the ID of the Kubernetes or OpenShift to assign to the project.
      kubernetes: 0
      # TODO: Fill in the name field.
      # This is the project name.
      gitUrl: ""
      # TODO: Fill in the branches to be deployed.
      branches: ""
      # TODO: Define the production environment.
      productionEnvironment: ""
    }
  ) {
    name
    kubernetes {
      name
      id
    }
    gitUrl
    branches
    pullrequests
  }
}
List projects and groups#
This is a good query to see an overview of all projects, clusters and groups that exist within our Lagoon.
query {
  allProjects {
    name
    gitUrl
  }
  allKubernetes {
    name
    id
  }
  allGroups{
    id
    name
    members {
      # This will display the users in this group.
      user {
        id
        firstName
        lastName
      }
      role
    }
    groups {
      id
      name
    }
  }
}
Single project#
If you want a detailed look at a single project, this query has been proven quite good:
query {
  projectByName(
    # TODO: Fill in the project name.
    name: ""
  ) {
    id
    branches
    gitUrl
    pullrequests
    productionEnvironment
    notifications(type: SLACK) {
      ... on NotificationSlack {
        name
        channel
        webhook
        id
      }
    }
    environments {
      name
      deployType
      environmentType
    }
    kubernetes {
      id
    }
  }
}
Querying a project by its Git URL#
Don't remember the name of a project, but know the Git URL? Search no longer, there is a GraphQL query for that:
Updating objects#
The Lagoon GraphQL API can not only display objects and create objects, it also has the capability to update existing objects, using a patch object.
Update the branches to deploy within a project:
mutation {
  updateProject(
    input: { id: 109, patch: { branches: "^(prod|stage|dev|update)$" } }
  ) {
    id
  }
}
Update the production environment within a project:
Warning
This requires a redeploy in order for the changes to be reflected in the containers.
 mutation {
   updateProject(
    input: { id: 109, patch: { productionEnvironment: "main" } }
  ) {
    id
  }
}
You can also combine multiple changes at once:
mutation {
  updateProject(
    input: {
      id: 109
      patch: {
        productionEnvironment: "main"
        branches: "^(prod|stage|dev|update)$"
      }
    }
  ) {
    id
  }
}
Deleting Environments#
You can also use the Lagoon GraphQL API to delete an environment. You'll need to know the project name and the environment name in order to run the command.
mutation {
  deleteEnvironment(
    input: {
      # TODO: Fill in the name field.
      # This is the environment name.
      name:""
      # TODO: Fill in the project field.
      # This is the project name.
      project:""
      execute:true
    }
  )
}
Querying a project to see what groups and users are assigned#
Want to see what groups and users have access to a project? Want to know what their roles are? Do I have a query for you! Using the query below you can search for a project and display the groups, users, and roles that are assigned to that project.
query search{
  projectByName(
    #TODO: Enter the name of the project.
    name: ""
  ) {
    id,
    branches,
    productionEnvironment,
    pullrequests,
    gitUrl,
    kubernetes {
      id
    },
     groups{
      id
      name
      groups {
        id
        name
      }
      members {
        role
        user {
          id
          email
        }
      }
    }
  }
}
Maintaining project metadata#
Project metadata can be assigned using arbitrary key/value pairs. Projects can then be queried by the associated metadata; for example you may categorize projects by type of software, version number, or any other categorization you may wish to query on later.
Add/update metadata on a project#
Updates to metadata expect a key/value pair. It operates as an UPSERT, meaning if a key already exists the value will be updated, otherwise inserted.
You may have any number of k/v pairs stored against a project.
mutation {
  updateProjectMetadata(
    input: { id: 1,  patch: { key: "type", value: "saas" } }
  ) {
    id
    metadata
  }
}
Query for projects by metadata#
Queries may be by key only (e.g return all projects where a specific key exists) or both key and value where both key and value must match.
All projects that have the version tag:
query projectsByMetadata {
  projectsByMetadata(metadata: [{key: "version"] ) {
    id
    name
  }
}
All projects that have the version tag, specifically version 8:
query projectsByMetadata {
  projectsByMetadata(metadata: [{key: "version", value: "8"] ) {
    id
    name
  }
}
Removing metadata on a project#
Metadata can be removed on a per-key basis. Other metadata key/value pairs will persist.
mutation {
  removeProjectMetadataByKey (
    input: { id: 1,  key: "version" }
  ) {
    id
    metadata
  }
}
